Where to Find Owl Be Crafty:

Sunday, October 30, 2016

Game On! Stamping Bella Stamp of the Month!

Happy Sunday Crafters! I wanted to let you know that you still have time to pick up October's Stamp of the Month called Game On by Mo Manning. I struggle with making masculine cards but this stamp made it easy because it's fairly large and can really be the focus of your card. 


I stamped the image onto Bristol smooth white cardstock with Ranger Archival Jet Black ink because I wanted to color with Zig Clean Color real brush markers and I tend to get the best results with this combination. I find Zigs to be really intense if you use them directly on the paper, so I color them onto an acrylic block and use a brush with a tiny bit of water to apply the color to the image. Because Bristol paper isn't watercolor paper you have to be careful how much water you apply. A tiny bit goes a long way!

Once the image was complete, I chose some coordinating patterned paper and cut out a wonky window using a die. I used foam tape to give this piece some dimension and then adhered the image piece to the back so my image was peeking out of the window. For my card base, I used a piece of Neenah Desert Storm cardstock cut to a A2 size and navy cardstock as mat for the plaid paper. For the sentiment, I decided to use a happy birthday word die cut out of the same navy cardstock. I adhered this right under the wonky window. To finish off the card, I wrapped some natural twine around the bottom and added a couple copper square brads to the top left corner. 

For more inspiration, click here to check out what the rest of the Stamping Bella design team did with this stamp. Remember it's the Stamp of the Month for October so you only have a couple more days to pick it up for 20% off. Click the link below for more details. 


I hope you have a great day and I'll see you again real soon! 

Supplies Used:


Saturday, October 29, 2016

Bellarific Friday - Sketch Challenge

Hello Crafters! The countdown to Halloween is on! I feel like this year is just flying. It's such a busy time for me at work so I haven't had as much time as I'd like in my craft room. I'm hoping after the next couple of weeks, I'll be able to breathe a little. Plus I have to get going on my Christmas cards. EEK! I can't believe I said that, lol!

Anywho, for this week's Bellarific Friday challenge, we were given the super fun MOJOBella sketck below to inspire us. I knew I wanted to use the new THE WIZARD, THE WITCH AND THE CAULDRON CHICKS stamp set so I had to get creative with how to position them. I didn't want to leave any of them out because they are too darn adorable!


Because the sketch had a vertical layout, I had to figure out how to incorporate all three chicks. I thought about how they might be in a castle with lots of books and knickknacks which means there would be lots of shelves. That would be the perfect place for a bossy little chick to oversee the other two while they performed their spell. I started by measuring where my shelf would go so that I could stamp the top chick along with the bottom two chicks. For my shelf, I cut thin piece of cardstock with a wood pattern and popped it with dimensionals. I used my go to Copic coloring combination of Simon Says Intense Black Ink and white X-Press It paper. 

Here's the colors I used:


I had two cute Doodlebug Halloween paper pads and they went perfectly with the chicks. I chose a striped one from the October 31st collection and the science doodles from Boos and Brews. I decided where they best fit and then cut them to match the layout. For the sentiment, I heat embossed it in white onto a piece of black cardstock and then popped it up with some dimensionals. For the finishing touches, I chose enamel dots in green, orange and purple and scattered them around. I also wanted to add some bling so I used Stickles, Glossy Accents and my Spectrum Noir clear sparkle pen. Did I mention I'm addicted to sparkles?? Here's a close up of some of little details I added:


Hop over to the Stamping Bella blog and see what the rest of the Design Team created. They are so creative and I look forward to seeing what everyone came up with for the challenge. Also, if you would like to participate in Bellariffic Fridays for a chance to be entered into a monthly drawing to win some Bella Bucks click on the link below for more details.


Next week's Bellariffic Friday challenge is to MAKE A TAG! Hope to see your designs too! Have a wonderful day and I'll be back soon! 

Supplies Used:


Saturday, October 22, 2016

Bellarific Friday - Photo & Color Challenge

Hello Crafters! What a long week this has been. I'm happy to report that we are finally getting some "fall" weather here in Florida. Everyday is getting less humid and cooler. Just in time for one of my favorite holiday, Halloween! For this week's Bellarific Friday card, we were asked to use the following as inspiration. I just love the color palette and really felt inspired by this challenge. I choose one of my favorite stamps from the recent new release called UPTOWN GIRL KITTY loves HALLOWEEN. She is just so adorable and I could wait to color her!


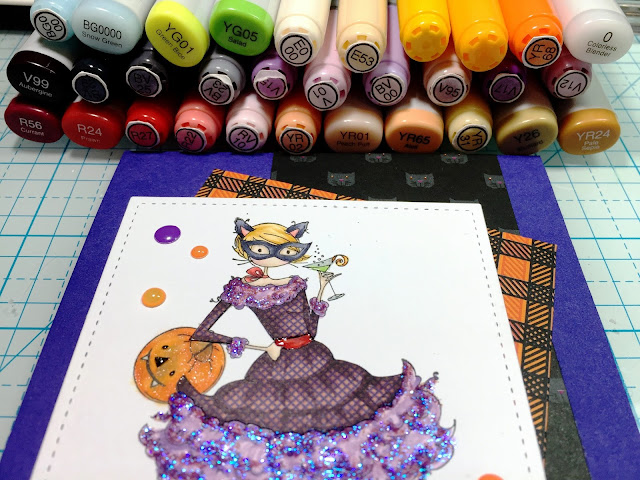
I wanted to add some texture to her dress so I decided to do a little paper piercing. This is such a fun technique and is an easy way to add extra interest to an image. I stamped the image onto the piece of pattern paper that I wanted to use. I used my MISTI so that I could get a pretty solid black line. This makes it easier to fussy cut. I then stamped the image in Simon Says Stamp Intense Black Ink onto a piece of white X-Press It Blending Card. I fussy cut the dress parts out of the patterned paper. This was particularly persnickety on her sleeves! Once finished, I adhered these pieces in place onto the stamped white image, pulled out my Copic markers and got to work. I did some shading on the pattern pieces as this brings the image to life more. The colors will still blend but you have to be careful not to over saturate. Also, Copics will look different on patterned papers so you might want to test them first. Here's a close up of the image and what colors I used:


After the image was complete, I used a stitched rectangle die to cut it out and give the white piece more interest. I also wanted to give her outfit a bit of sparkle so I grabbed some purple Stickles, Glossy Accents and a clear Spectrum Noir Sparkle pen. I applied the Stickles to the ruffles on her skirt, neckline and cuffs. The glossy accents went on her glass and the pumpkin's face. I then coated her mask, all of the red accents and the pumpkin with the sparkle pen. 

For the background, I choose this fun Halloween paper with adorable little cats which went perfectly with Kitty. I also chose some plaid paper that coordinated well with the color palette of the challenge. For my card base, I picked a vibrant purple cardstock. I then layered all of the pieces making sure my image stood front and center. 

 I stamped the sentiment onto a piece of orange patterned paper and then rounded the edges and ran a little black ink around it .This ensured it didn't blend too much into the background. For the finishing touch, I grabbed my go to enamel dots and placed a few of them around. Here's one more closeup:


I just love Halloween cards and I really like how Kitty turned out. This was a super fun challenge!

Don't forget to check out the Stamping Bella blog and see what the rest of the Design Team created. These women always inspire me and come up with such fun designs! Also, if you would like to participate in Bellariffic Fridays for a chance to be entered into a monthly drawing to win some Bella Bucks click on the link below for more details.


Next week's Bellariffic Friday challenge is a sketch challenge. Use the fun (MOJO)Bella below as inspiration for your card design. I would love to see you all participate! Have a wonderful weekend and I'll see you again soon!


Supplies Used:

Friday, October 14, 2016

Bellarific Friday - Sketch Challenge

Hello Crafters! I'm excited to be back and sharing my card for this week's Bellarific Friday sketch challenge.  Here's the awesome (MOJO) Bella sketch by Julee Tilman we were given to use. I couldn't help but choose a fun Halloween image and Tiny Townie Willow the Witch is one of favorites! She's so sassy and I love the little chicks all decked out in Halloween outfits! The image includes two more chicks on her right side but because the space in the sketch was more vertical, they got edited out. I did save them for a future project though! 


I stamped the image using Simon Says Stamp Intense Black ink onto a piece of white X-Press It Blending Card. These are my go-to supplies for coloring with Copics. My favorite part of this image was creating her skirt. I chose several different BV colors and applied them using a flicking stroke. I also wanted it to appear glittery so I used the "dotting" technique in the shadow areas just to give it a more textured look. Here's a close up and the Copic colors I used. 


Once she was all colored, I couldn't resist pulling out my Copic Spica pens and dotting a ton of little glitter dots in both silver and purple all over her skirt and hat. I also applied some little white dots using a gel pen. This give the illusion of sequins. But I couldn't stop there, so I finished embellishing the images with some stickles and my clear Spectrum Noir sparkle pen. I swear I have a serious addition to all things glitter! 

Next I choose some patterned papers that would help the image pop. Since there was a diamond shape in sketch, I used this as inspiration in choosing a piece of green and black paper with a harlequin pattern. It's from an old Michael's Halloween paper pack that's no longer available but I've seen similar patterns in different Halloween paper packs.

I adhered my little witch flat onto this patterned paper and then applied foam tape to the back of the whole piece. I cut the orange paper down to size and wrapped some black twine around it taping it to the back to secure it in place. I tied a little bow separately and glued this down to the twine. I find this way easier than trying to fiddle with tying the perfect bow with the wrapped pieces. I then adhered this panel down to my card base and secured the piece with my image on top. I had made sure that there was a space between the foam tape on the back of the image so that the twine fit in nicely and it made my card more flat and even. 

For the sentiment, I cut a piece of dark purple cardstock to a inch and a half square and turned it sideways to create my diamond. I then heat embossed the word "Boo!" in white. I adhered this piece next to the witch using a combination of foam tape and flat adhesive to ensure the sentiment also laid flat. Lastly, I had to add a few little enamel dots to the corner just to tie everything together. 

Here's a close up of some of the little details:


I really enjoyed using this sketch this week. It's always a nice way to get inspired and step out of my little card making box. I don't typically give out Halloween cards but I absolutely love to make them! I'm going to have a little Halloween Card Series on my Instagram starting next week, counting down the days until Halloween. Be sure to follow me if you haven't already.

Also, don't forget to hop over to the Stamping Bella blog and check out what the rest of the Design Team created. These Bellas are so talented! Did I mentioned I'm so proud to be apart of this team?  Also, if you would like to participate in Bellariffic Fridays for a chance to be entered into a monthly drawing to win some Bella Bucks click on the link below for more details.


Next week's Bellariffic Friday challenge is a color and photo challenge. Use the photo and/or colors below as inspiration for your card design. I would love to see you all participate! Have a wonderful weekend and I'll see you again soon!


Supplies Used: