Where to Find Owl Be Crafty:

Saturday, September 23, 2017

Bellarific Friday - Photo & Color Inspiration

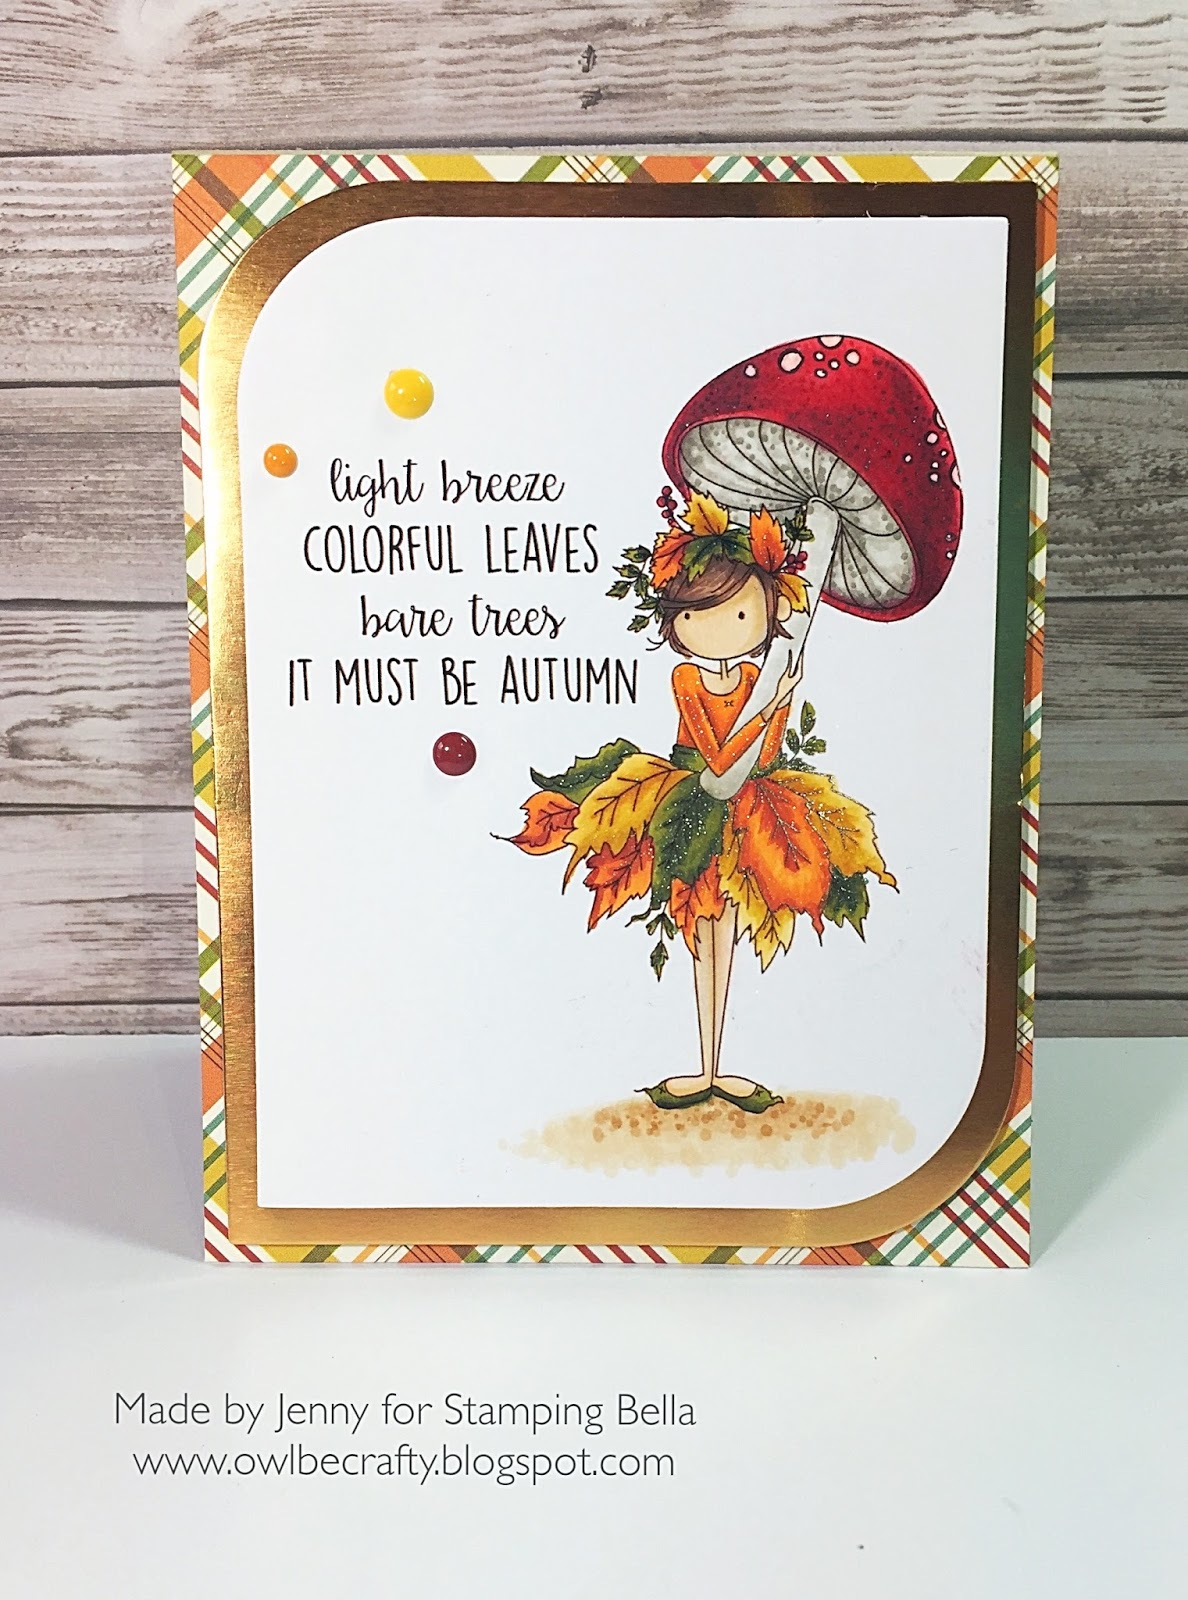
Hello Crafters! I'm so happy to be back with another Bellarific Friday post. The last week and a half has been a bit stressful. I'm in Orlando and was affected by Hurricane Irma. We lost power for four days and are finally getting back to some normalcy. For me that means spending some time in my craft room. This week's challenge for Bellarific Friday was a gorgeous color combo. I picked up the new TINY TOWNIE GARDEN GIRL CHRYSANTHEMUM and could not wait to color her. She was one of my favorites from the new release and did not disappoint. 


I stamped the image using Simon Says Stamp Intense Black Ink onto a piece of X-Press It blending card. This is my go-to combination for coloring with Copics. I chose colors based on the photo and layered them on her dress and hat. When selecting what colors to place next to each other, I made sure that if they overlapped they wouldn't create a muddy color. For example, I kept the yellow away from the purple. These two colors create a really ugly brown. The purple, blue and pink all blend nicely and actually look better mixed a bit. For her skin tone, I didn't use my go to colors and tried something a bit darker. I thought this went really well with the bright colors. I also used one of the new to me florescent colors. I love these and just need to figure out the best combos to use them. The FV2 went really well with BV04 and BV02.

Here's a look at all of the colors I used. 


Once I finished the coloring, I fussy cut around the image leaving a small white border. If you don't like fussy cutting, you can purchase the coordinating "Cut It Out" die and it would produce the same look. I wanted the little image to be the center of the card so I decided to go with a graphic and simple background. I grabbed cardstock that corresponded with the photo colors and die cut them using a long stitched rectangle die. I then adhered them to the card base in a pattern that I thought would work best. I popped up the girl using foam tape and adhered her into place. I chose a sentiment from another Stamping Bella stamp and stamped it into place on the yellow rectangle. 

I thought it needed just a little bit of bling and chose three different colors of enamel dots to highlight the sentiment. Now you know I can't forget the sparkle! I grabbed Copic Spica markers in coordinating colors and added sparkle dots to each layer of petals. I also used my clear Wink of Stella glitter pen to smooth out the dots. It's super hard to capture on camera, but in real life it's sparkly, textured and gorgeous! 

Here's a closer peek:


Be sure to check out the Stamping Bella blog to see all of the colorful cards the rest of the Bella Babes created. I seriously love this color combo and will definitely use it again! If you would like to participate in Bellarific Fridays for a chance to be entered into a monthly drawing to win some Bella Bucks click on the link below for more details. 


Next week's Bellarific Challenge is to use CHOCOLATE! Yes, that's right, chocolate. It can be a chocolate stamp, chocolate paper, white chocolate paper, chocolate patterned paper, whatever inspires you! I hope everyone has a wonderful weekend and I'll be back soon!


Friday, September 8, 2017

Bellarific Friday Sketch Challenge

Happy Friday Crafters! It's been a somewhat stressful week here in Florida with Hurricane Irma on her way. I'm glad to switch focus for a few minutes and share a funky little card for this week's Bellarific Friday Challenge. We were given the fantastic Mojo Bella sketch below as inspiration. I love the Tiny Townie Garden Girls and I wanted to use the Orchid girl in a unexpected way. I googled Orchids and found the gorgeous orange, pink and yellow one below. I didn't realize they came in such bright and unique color combos so I knew I had to use this one as inspiration! 


I just can't put away my Copic markers! Maybe next week I'll try... So I grabbed a piece of X-Press It blending paper and stamped the image in Simon Says Stamp Intense Black Ink. Using the photo as a guide, I chose colors that matched and did my best to recreate the design of the flower. It was definitely a challenge and if I had to color it again there are some things I would change. 

I decided to just go with the flow and try not to pick apart every little fault I saw. I wanted to make her "dress" a bit more special so I pulled out some Stickles in yellow, orange, and pink and applied them originally in detail spots but then I got carried away and just about covered the entire dress, lol! What can I say? I'm addicted to sparkle! 


I set aside the image so that the Stickles could completely dry and focused on creating the background. I really like the stacked squares in the sketch so I turned to my patterned paper stash and selected bright papers that matched the orchid. I cut the yellow paper using my paper trimmer and the white piece using a stitched rectangle die. I then pulled out my new favorite dies, the MFT Mod Square Stax to add a bit more interest to the corner squares. 

I had originally arranged the pieces on a plain black card base but it didn't feel special enough. I looked through my background stamps and decided to use the MFT Etched Tribal Stamp. I prepped the black card base using the EK Success Powder Tool since I was using so much embossing powder. This tool ensures that the embossing powder only sticks to the ink. I stamped the image in Versamark clear sticky ink, covered it with clear embossing powder and set it with my heat gun. I just love the subtle detail this tone on tone trick supplies. 

After assembling the card base, I turned my focus back to the image. I fussy cut the image, leaving a small white border around it. I then mounted her to the card base using foam tape. I really like how she didn't completely fit inside the frame. It made her look like she's popping off the card. To finish it off, I grabbed a few black enamel dots and that was it! 

Here's a closer look at all that Stickles sparkle! In real life you can tell that the glitter is different colors. It really enhances the Copic coloring. 


Be sure to check out the Stamping Bella blog and see how the rest of the Design Team used the sketch as inspiration. I love using sketches and it's neat to see how others interpret them. If you would like to participate in Bellarific Fridays for a chance to be entered into a monthly drawing to win some Bella Bucks click on the link below for more details. 


Next week's Bellarific Friday challenge is one of my favorites - Create Your Own Background. You can use stamps, papers, embossing, dies, and more! Just get creative and join in the fun! 

To all of those in Florida that are also facing Irma, I send you positive vibes. Florida Strong! See you next time!


Monday, September 4, 2017

Stamping Bella Fall Release Day!

Hello Crafters! Today's the day! The new fall release for Stamping Bella is now available in the online store. There are some adorable autumn and Halloween images along with a few more Garden Girls. The Chrysanthemum Girl is everything! I can't wait to go shopping! 

For today's card, I'm using another one of The Littles scene stamps called THE LITTLES HEDGIE AND HIS ACORNS. Like yesterday's card, these scene stamps already combine several of The Little Bits images so that you don't have to mask and plan. You can just stamp and go! If you want to recreate this scene with single stamps, you'll need the Little Bits Fall Fruit set. I also used the new FALL SENTIMENT set. This is an essential set for all of your Halloween and autumn sentiments. A must have for sure!


So I've been on a Copic kick. It's always been my favorite medium to color with and I just couldn't resist using them to create some texture on this adorable image. I stamped the image onto X-Press It Blending Card with Simon Says Stamp Intense Black Ink. This combination gives me the best results when I use Copic Markers. After doing basic coloring, I went back and added details by adding little dots to the mushrooms and some lines to the acorns. I also used Nuvo Pale Gold drops on the large dots on top of the mushrooms. (Note: I did this after I ran it through my die cutting machine! If you do it before you'll have smashed dots!)

Here are the Copic colors I used:


I created a top folding A2 size card from Neenah Dessert Storm cardstock. This is my favorite "fall" themed card base. It goes with all of the fall color schemes and it not a stark as white. I chose a few pieces of patterned paper for my background and adhered them to the card base. I used a die cut to create the frame for the image and popped it up using foam tape. 

Next I stamped the sentiment and cut a fishtail banner end using my scissors. I then trimmed down patterned paper to make another fishtail banner to place behind the sentiment strip. I used my tiny attacher stapler to connect them and then adhered them flat to my card base. I wanted to add one more detail so I grabbed some May Arts twine, tied a bow and glued it to the sentiment strip. That finished up my card!

Here's a closer look at the details:


Now, get your lists ready and make sure you get your hands on your favorite new sets. Click the link below to go straight to the shop.

Have fun and happy shopping!


Sunday, September 3, 2017

Stamping Bella Release Preview - Sneak Peek #3!

Hello Crafters! I'm back with another sneak peek from the new Stamping Bella Fall Release. As you can see there are some beautiful fall images and if you hop over to the Stamping Bella blog you'll see adorable Halloween images as well. All of these new sets will be available TOMORROW, Monday, September 4th in the Stamping Bella online store. Eek! I can't wait! My list is VERY long!

For today's card, I'm using the THE LITTLES PUMPKIN FRIENDS stamp. This is a Littles scene stamp. These one step stamps make scene building super easy! It combines several of the Little Bits sets so you don't have to mask and plan and all of that! For example, if you wanted to create this image on your own, you'd have to use stamps from the Little Bits Fall Fruit set and the Little Bit Nature Collection. Emily aka Stamping Bella, has taken all the hard work out and created these pre-made scene stamps, which I love! Huge time savers!


I started by stamping the image onto a X-press It Blending card in Simon Says Stamp Intense Black ink. This is my go-to combo for coloring with Copics. I choose the accents colors base on the Echo Park paper pad called A Perfect Autumn. It uses a hint of teal which is so unexpected for this season. After coloring the image, I added a few little dots to her scarf using an orange Spica pen to give it a little sparkle. Next, I grabbed my scissors and fussy cut around the entire image. There is a "Cut It Out" die for this image so you won't have to fussy cut! It comes in a bundle with the stamp and saves you both time and 15%! Win Win!

For my card base, I created a top folding A2 size card using Neenah Dessert Storm cardstock. I pulled out three different patterned papers from the Echo Park A Perfect Autumn pad and cut them down to the desired sized. I adhered these all together but using a bit of scotch tape on the back. I then pulled out some May Arts natural twine in Burlap. I secure one end to the back of the card using scotch tape and then wrapped it around the panel a few times to get the desired look. Next I adhered this panel to the card base. I applied foam tape to the back of the image and positioned it on the card. Since the patterned paper had fall sentiments, I didn't need to add a separate one so I just finished the card off with a few enamel dots. Easy peasy!

Here's a closer look at the card:


Be sure to pop over to the Stamping Bella blog and see more sneak peeks as the design team continues to countdown to release day on September 4th! You can also enter for a chance to win some Bella Bucks! I'll be back tomorrow to share one more new release card!


Saturday, September 2, 2017

September Stamp of the Month for Bellarific Friday

Hello Crafty Friends! Can you believe it's September? I'm so excited because fall is my favorite time of year and I just can't wait for all of the great things that come with it! A new month brings a new Stamp of the Month over at Stamping Bella and this month it's the gorgeous TINY TOWNIE AUTUMN LOVES AUTUMN. All month long you can pick up the stamp, the die and the bundle for 20% off. 

And while you are placing your order, don't forget the new Stamping Bella release will be available on Monday, September 4th! Check out the Stamping Bella blog for more sneak peeks!


I really wanted to make Autumn the star of the card so I decided to keep it simple and focus on the fun fall colors and details in the coloring. I used my go to Copic combo of Simon Says Stamp Intense Black Ink and X-Press It Blending Card. I selected a fall palette of reds, oranges, greens, browns and yellow. Once I had finished the image, I went back and added some details with my Spica glitter pens and also a dotting technique to add texture to the mushroom and the dirt. This is a super easy way to add the little something extra. Here's a look at the markers that I used to bring Autumn to life.


After stamping the sentiment, I wanted to give the image panel a bit more interest so I grabbed my new obsession, the MFT Mod Rectangle dies to trim down the image panel. I also ran a piece of copper foil paper through my die cutting machine using the next largest Mod Rectangle die. I matted this to the back of the image so that there was a neat pop of copper shine framing it. For the card panel, I adhered a matching plaid patterned paper to the base and then popped up the mod rectangle panels with foam tape. To finish off the card, I used a few matching enamel dots to highlight the sentiment. Here's a closer look at the shimmer:


Be sure to check out the Stamping Bella blog and see the rest of the Bellas created using this gorgeous fall stamp. All of the samples make me want to grab a pumpkin spice latte and roll around in some fall leaves! If you would like to participate in Bellarific Fridays for a chance to be entered into a monthly drawing to win some Bella Bucks click on the link below for more details. 


Next week's Bellarific Friday challenge is the fantastic Mojo Bella sketch below. Hope you join along and create something with us! And don't forget, the new Stamping Bella release will be available on Monday, September 4th! Come back tomorrow to see another sneak peek of the new release! See you tomorrow!