Where to Find Owl Be Crafty:

Showing posts with label Challenge. Show all posts

Saturday, September 23, 2017

Bellarific Friday - Photo & Color Inspiration

Hello Crafters! I'm so happy to be back with another Bellarific Friday post. The last week and a half has been a bit stressful. I'm in Orlando and was affected by Hurricane Irma. We lost power for four days and are finally getting back to some normalcy. For me that means spending some time in my craft room. This week's challenge for Bellarific Friday was a gorgeous color combo. I picked up the new TINY TOWNIE GARDEN GIRL CHRYSANTHEMUM and could not wait to color her. She was one of my favorites from the new release and did not disappoint. 


I stamped the image using Simon Says Stamp Intense Black Ink onto a piece of X-Press It blending card. This is my go-to combination for coloring with Copics. I chose colors based on the photo and layered them on her dress and hat. When selecting what colors to place next to each other, I made sure that if they overlapped they wouldn't create a muddy color. For example, I kept the yellow away from the purple. These two colors create a really ugly brown. The purple, blue and pink all blend nicely and actually look better mixed a bit. For her skin tone, I didn't use my go to colors and tried something a bit darker. I thought this went really well with the bright colors. I also used one of the new to me florescent colors. I love these and just need to figure out the best combos to use them. The FV2 went really well with BV04 and BV02.

Here's a look at all of the colors I used. 


Once I finished the coloring, I fussy cut around the image leaving a small white border. If you don't like fussy cutting, you can purchase the coordinating "Cut It Out" die and it would produce the same look. I wanted the little image to be the center of the card so I decided to go with a graphic and simple background. I grabbed cardstock that corresponded with the photo colors and die cut them using a long stitched rectangle die. I then adhered them to the card base in a pattern that I thought would work best. I popped up the girl using foam tape and adhered her into place. I chose a sentiment from another Stamping Bella stamp and stamped it into place on the yellow rectangle. 

I thought it needed just a little bit of bling and chose three different colors of enamel dots to highlight the sentiment. Now you know I can't forget the sparkle! I grabbed Copic Spica markers in coordinating colors and added sparkle dots to each layer of petals. I also used my clear Wink of Stella glitter pen to smooth out the dots. It's super hard to capture on camera, but in real life it's sparkly, textured and gorgeous! 

Here's a closer peek:


Be sure to check out the Stamping Bella blog to see all of the colorful cards the rest of the Bella Babes created. I seriously love this color combo and will definitely use it again! If you would like to participate in Bellarific Fridays for a chance to be entered into a monthly drawing to win some Bella Bucks click on the link below for more details. 


Next week's Bellarific Challenge is to use CHOCOLATE! Yes, that's right, chocolate. It can be a chocolate stamp, chocolate paper, white chocolate paper, chocolate patterned paper, whatever inspires you! I hope everyone has a wonderful weekend and I'll be back soon!


Thursday, September 8, 2016

Candy Apple Halloween Card

Happy Thursday Evening!  Today's card is my first in what will be quite a few Fall/Halloween cards to come. This is my favorite season and I think because I live in Florida where we only have two seasons, hot and hotter, making Fall cards lets me vicariously experience another season! I was inspired this week by the latest Curtain Call Challenge - Candy Apple.


I used an adorably funny stamp from Sweet Stamp Shop called "Apples." I stamped it in Simon Says Stamp Intense Black ink on Copic friendly cardstock. I picked some red and green Copic markers and colored the little scene. I wanted the candy coating to look like shiny so I applied some glossy accents and set the piece aside to dry. I wanted to bring in the black & white polka dots from the inspiration photo so I grabbed a piece of glittery paper and die cut it with a circle die. I also cut the image with a smaller circle die once the glossy accents had dried.

I then cut some gray and white striped paper to add a little neutral background on the otherwise white card base. For the sentiment, I stamped it onto black cardstock with clear Versamark ink and used some white embossing powder to really make it pop. I adhered this along the bottom of the circles and popped it up with foam tape. To finish off the card, I used a few black enamel dots to add a little bit more interest. Here's a close up of some of the details:


Be sure to head over to the Curtain Call Challenge blog to see all of the wonderful entries. Have a great night and I'll be back tomorrow with another fun card share!

Supplies Used:


Monday, September 5, 2016

Just a Note Card - Color Throwdown #408

Happy Monday! I'm excited to share a card that I created after being inspired by the current Color Throwdown Challenge which called out primary colors of red, blue, green and yellow. I was dying to use this shaker die from Papertrey Ink and this was the perfect challenge to bring it out. 


I really enjoy using these shaker dies because they make the process so easy! I started by grabbing some polka dot cardstock in red, yellow, gray, khaki and black. I die cut the various parts of the pencil and then began adhering them all together. Once that was complete, I grabbed some acetate for the window and some fun foam to create the shaker container. Once I had assembled those pieces I filled the two separate windows with red & yellow sequins and seed beads and then adhered the backer piece to keep everything contained. 

For the card background, I used blue patterned paper adhered to a 5"x5" card base. I then used a notebook die to die cut a little piece of patterned notebook paper and backed that with a piece of chevron paper in primary colors. This is a direct inspiration from the Color Throwdown photo. I stamped and heat embossed the sentiment onto the notebook page. I also die cut the scribble to put underneath the pencil. Lastly, I needed a few little embellishments so I grabbed some enamel dots and stars from my stash to finish off the design. 

Here's a closer look at the card and all the fun little details! 


I really love how this turned out and I think it would be a perfect Teacher card. I hope you enjoyed my card for today and be sure to pop over the the Color Throwdown Challenge to check out all of the creative and fun designs that everyone did. It's always so inspiring!

 Color Throwdown Challenge

Have a wonderful day and I'll see you again soon!

Supplies Used:

Friday, August 26, 2016

Summer Popsicle Card

Happy Friday Crafters! It's been a long week and I'm really looking forward to some R&R this weekend. For this card, I was inspired by the Paper Players challenge to do "Something Sweet." These adorable little popsicle stamps have been sitting in my "to use" pile for a few weeks and this was the perfect opportunity to use them. 


I began my card by grabbing some of my favorite bright ink pads. I stamped each of the popsicle designs in a different color. I then used a Copic marker in a slightly darker shade to give each pop a little bit of shadow. Each pop was then die cut using the corresponding die. For the background piece, I ink blended some Salty Ocean distress ink to give them a nice light blue background. I then layered the pops to my liking and adhered the back ones flat while popping up the two front ones some dimensionals. I had this super cute summer paper pad and choose a piece that incorporated all of the popsicle colors. Plus I love that it's a bunch of summer-time words! I decided it needed a little mat so I chose a bright yellow cardstock to put behind it. After adhering all of the papers to the card base, I grabbed some sparkling clear sequins and some Stickles because I always need a little bling! That really finished my design. I love how this card really captured summer!

I'm entering it into the Paper Players Something Sweet challenge. There are lots of yummy cards on their blog so be sure to go check them out below!


Have a wonderful weekend and I'll be back soon!

Supplies Used:

Monday, August 22, 2016

"Punny" Smoothie Card

Happy Monday! I hope everyone had a wonderful weekend. I was able to spend some much needed time in my craft room this weekend. I was searching around for current challenges and two inspired me to create this fun or should I say "pun" card!


I purchased the Lawn Fawn "So Smooth" set a while back and I was so glad I finally got to ink it up. Plus, I couldn't wait to turn that little blender into a shaker! Having been inspired by the sketch at Retro Sketches, I decided to make three pattern papers using the tiny fruit stamps in the set. These were all colored with my Copics and it took me a little longer than I anticipated, but the results were worth it! After I cut my patterned papers to the size I wanted, I choose some solid color mats to place behind them. This helped them stand out a bit and not blend too much together.

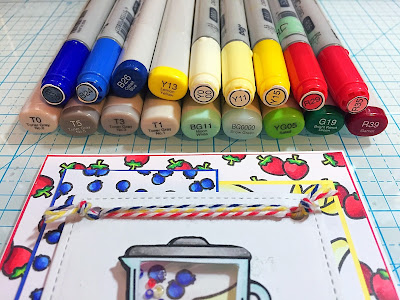
I used a Lawn Fawn stitched banner die to create the center piece that would hold the blender. I stamped the sentiment in Versafine ink and heat set it with clear embossing powder. Next, I stamped the blender image on Copic friendly paper with Simon Says Stamp Intense Black Ink and after coloring it, I used an Exacto knife to carefully cut out my shaker window. I backed it with a small piece of acetate and cut tiny strips of foam tape to create the container for the shaker bits. I lined up the blender where I wanted it on the banner and used a pencil to draw a little outline. This helped me to know where to stamp the fruit that would be visible in the shaker window. I then choose some seed beeds in yellow, blue, red and clear. I sprinkled them onto the stamped fruit and adhered my blender on top. I felt that I needed to add a bit of a scene behind my blender so I stamped up a few more fruits and adhered them behind the blender. To ground the whole scene, I used a little bit of gray Copic to draw in a shadow. Here are all of the Copics that I used:


Before popping up the banner on top of the patterned papers, I grabbed three different colors of bakers twine and looped them through the top of the banner. Instead of a bow, I knotted the ends of the twine to secure them in place. There may be a lot going on in this card but somehow it works, lol! Here's a close up of the shaker:


As I mentioned I will be entering this card into two challenges this week, Retro Sketches and Lawnscaping Challenges. Make sure to go check out all of the fabulous Design Team cards. They are really inspiring!


I hope you all have a wonderful week and I'll see you next time!

Supplies Used

Friday, August 12, 2016

Dragon Birthday Card

Happy Friday! A few months ago My Favorite Things released a unicorn stamp set that I fell in love with. This month they followed that up with an equally cute dragon set! I knew I had to get it and couldn't wait to play with it. I also picked up some of the cute new birthday candle dies and after seeing some samples of them together, decided to try my own version.


I started by stamping and coloring the little dragon image with my Copics. I added some dot detail with my white gel pen and also some glossy accents to his horns and claws. Next I decided to do a little fussy cutting and left a tiny white border around the entire image. Here are the Copics I used:


For the cake, I used a My Favorite Things cake die-namics to create this image. I picked some fun polka dot paper and a coordinating cardstock. Once it was assembled, I added Spectrum Noir clear sparkle pen all over the purple frosting. You can tell from the picture how sparkly that stuff is! I just love it! Next, I cut the flames and candles with another MFT die-namic from a yellow glitter paper and Copic friendly white paper. I added a slight blue highlight to the candles so that they popped a little bit. I also colored the wicks gray so they would look like they had been lit. 

For the background, I used my Copic airbrush system and a homemade stencil to create the clouds. I used purple and blue Copics just to make it a bit more whimsical. I adhered the dragon and all of the cake parts. I decided to pop up the flames with some dimensionals. 

The sentiment did not fit as it was so I did something that make some stampers cringe, I cut the clear stamp to make it work for me. I promise this doesn't hurt your stamp and it will fit back together perfectly. I used my MISTI to ensure the sentiment was lined up correctly and I also embossed it with clear embossing powder to give it a little bit of shine. To finish it off, I added some of my favorite sparkling clear sequins. Here's a close up of some of the details:


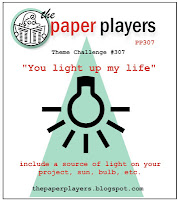
I just love these little dragons! I know this is going to become a favorite set of mine. I think a dragon/unicorn scene may be coming soon! I will be entering this card into the current Paper Players challenge which involves a source of light. I'd say those large candles would provide LOTS of light! Be sure to check out some of the other great entries below. They are always so inspiring!


http://thepaperplayers.blogspot.com/2016/08/pp307-theme-challenge-from-joanne.html

Have a wonderful weekend and I'll be back again soon!

Supplies Used:

Saturday, July 30, 2016

Loads of Fun Birthday Card

Hello Crafters! Happy Saturday! It's been a little while since I've done a proper blog post. Work has been crazy and I haven't had a lot of time to sit and blog. I promise I'll try to do better, lol! For today's card, I stamped up some adorable Lawn Fawn images from the set Loads of Fun. I knew when I first saw it I would have to make the washing machine into a shaker card. 


I decided to create a little scene card. I started by stamping and coloring the washing machine with my Copics. I used a circle die to cut out the inner part of the washing machine. It's hard to tell in the picture, but the inside of the washing machine is also colored with Copics and there are a few little bubbles stamped there too. I created my shaker window by adhering acetate to the back of the open circle and using foam tape to create a container for my shaker bits. I then colored some clothes and fussy cut them out so that I could have them shake around inside the washer. I put those along with some clear sequins and clear and blue seed beads into the shaker window adhering my back panel to seal it all up. That completed my washer element.

I was trying to figure out how to incorporate a sentiment and then it hit me, I could make the sentiment strip a shelf. So I colored and fussy cut the little accessories, stamped and heat embossed the sentiment on a strip of black cardstock and then I popped them all up with foam tape. I really like how the little scene came together. It's also so much fun to watch the clothes shake around in the washer. I wish laundry in real life was this fun! Here's a better look at the shaker element:


For the inside of the card, I stamped, colored and fussy cut the little laundry basket. I adhered it down and then stamped the sentiment above it. It needed something so I grabbed my Spectrum Noir clear sparkle pen and gave the clothes a once over. I wish all of wardrobe was that sparkly, lol!


I'm entering this card into two challenges this week: MarkerPop Blog Challenge - #100 Create a Scene and Simon Says Stamp Wednesday Challenge - Anything Goes. Be sure to pop by the blogs and check out all of the other great entries.


I hope the rest of your weekend is "loads of fun!" I'll see you next time!

Supplies Used:

Friday, March 25, 2016

Delicate and Pink Easter Card

Happy Good Friday! Today I wanted to share a sweet little Easter card. I can't believe it's that time already! Where is 2016 going? For this card, I used a precious Stamping Bella stamp called "Bunny has a Daffodil." I think this card speaks to all things Spring and Easter with the pastel colors, softness and cute little images.


I started by stamping the image on a piece of Copic friendly cardstock in Simon Says Stamp Intense Black ink. I'm loving this ink by the way. It's so crisp and perfect to use with Copic markers. Once the image was fully colored, I used a wonky stitches die cut to frame it out.

Here's the Copic markers I used in this piece:


For the background, I selected a patterned paper to bring out the yellow and a coordinating pink shade to help her dress pop. Before adhering these down, I grabbed a piece of vellum and heat embossed a sentiment in white. I taped it to the back of the pink panel and cut a little banner end. I used some multi medium matte behind the words of the sentiment to adhere the banner down to the piece. This way you won't see the adhesive through the vellum.

To finish the card off, I put some Stickles on her dress, bunny ears and egg. I also covered her dress in my new clear Spectrum Noir Sparkle pen. It works just like Wink of Stella but it's more of a silver hue versus a gold hue. Lastly, I had to use a few sequins for a little bit more sparkle.

There are so many great challenges happening this week so I had to join a few. Here are the three challenges I'm submitting my card to:


The Paper Players - Celebrate Spring Challenge
The Card Concept - Challenge #51 - Naturally Pink (Clean & Layered Style Category)
Addicted to CAS - Delicate Challenge

Please be sure to check out all of the challenges and feel free to add your own entry!

Thank you for stopping by and I hope everyone has a wonderful Easter weekend!

Supply List: